Get started using the Genius Hub API. This is the first post in a series about how to use the public API, step by step.
In this article, we are going to use NodeJS to see how we can access the API to extract some data from a Genius Hub, and display it to the user.
If you are familiar with using REST APIs, jump straight to the docs: https://my.geniushub.co.uk/#/docs otherwise, read on!
Intro – Tokens – why use them?
The API uses tokens. Why? They have the following advantages over a username / password authentication scheme:
- They are more secure
You do not have to pass around your username and password.
They are by default as secure as a very long and complex password! - They expire
You can make a short lived (temporary) token, and pass it to someone, if you so desire.
Left your username and password written down in your old notebook? If you did this with a token (or the electronic equivalent), then you know that the token will only exist for a sensible amount of time, and then expire. - They can be revoked
Accidentally committed some code with your token in it? Easy to fix! Just revoke the token and create a new one.
So, we are going to use tokens to access the API. How do we do it?
Step 1 – Check that your Hub is up to date
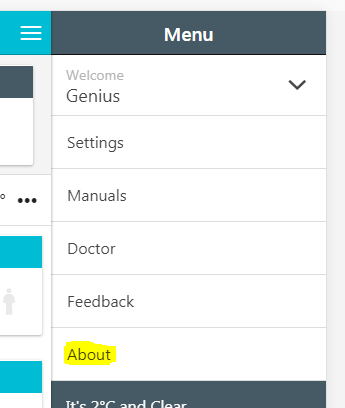
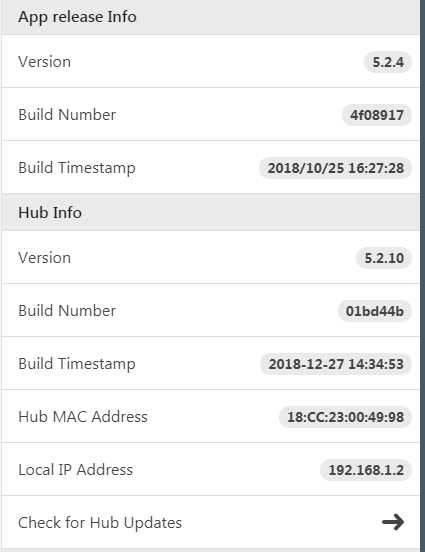
Your Genius Hub needs to have have firmare version 5.2.10 or higher to allow access to the public API. You can check this by logging into the app (link) and checking the ‘About’ page. If your Genius Hub is on a lower firmware version, you will need to update it by choosing ‘Check for updates’.
Step 2 – Generate an API token
Visit https://my.geniushub.co.uk/ and log in with the credentials for your Genius Hub.
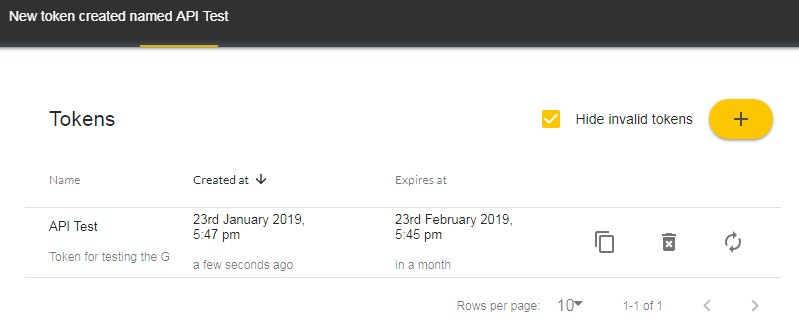
Select the ‘Tokens’ menu from the top of the page.
Click the yellow ( + ) icon at the top right of the page to create a new token.
Give the token a name. In this case call it something like ‘Genius Hub API demo’.
You can leave the expiration date as it is, or extend it if you prefer. The default is for it to expire in one month, which helps to keep your Genius Hub secure.
You can also provide a longer description for the purpose of the token, if you wish.
Press Create Token.

Step 3 – Access your token
Choose the ‘Tokens’ menu option (you will be taken here automatically after creating a new token).
Press the ‘Copy to clipboard’ icon to the right of the token that you wish to use.
Step 4 – Write some code!
The example below uses Codepen. You can edit the code directly to play with it.
Just set the ‘myToken’ variable to a token that you have generated, and you should find a list of your zones and their temperatures printed out in the ‘Result’ pane!
See the Pen Genius Hub Public API Demo by Simon Turner (@smturner) on CodePen.
ES6
The code above is using ES6 (‘modern Javascript’). Here are a couple of great resources, if you want to learn more:- Free (brief) online course: https://www.freecodecamp.org/news/want-to-learn-es6-take-this-free-23-part-course-and-become-a-javascript-ninja-55002db1ff74
- Mozilla reference pages: https://developer.mozilla.org/en-US/docs/Web/JavaScript
- A bit more advanced, for testing your knowledge: https://es6katas.org/
Get the data
The ‘getGeniusHubZoneData’ uses ‘fetch’ which is an API call that is built into most modern web browsers. It lets you make an HTTP request (in this case from my.geniushub.co.uk), and capture the result. It uses the ES6 version of promises (async / await) which basically means that the code will wait whilst the browser goes away, talks to the remote server, and collects the result. We are setting the Authorization header, to tell ‘fetch’ to use our token, so that my.geniushub.co.uk will know which Hub to get the information from, and also authenticate that we are allowed to do that! Finally, the API returns results in the JSON format, so we call ‘data.json()’ to convert the HTTP body text, into a javascript object that we can use directly in our program.Show the data
We’ve called the getGeniusHubZoneData function, now let’s put the result where we can see it. The API endpoint that we called ‘/zones/’ returns a list, so we’ll print that to the screen. We use the ‘document.write’ function to put HTML onto the webpage output pane. We iterate through each zone one at a time, using a ‘for’ loop, and for each zone, we print out the information that we want: zone ID, zone name and zone temperature (if the zone a temperature reading).Discuss!
Let us, and other users know what you’ve been up to on our forum: https://forum.geniushub.co.uk
(You can log in with your Hub username and password).
Thanks for reading! Don’t forget to sign up to our newsletter for more articles like this each month (link is below).